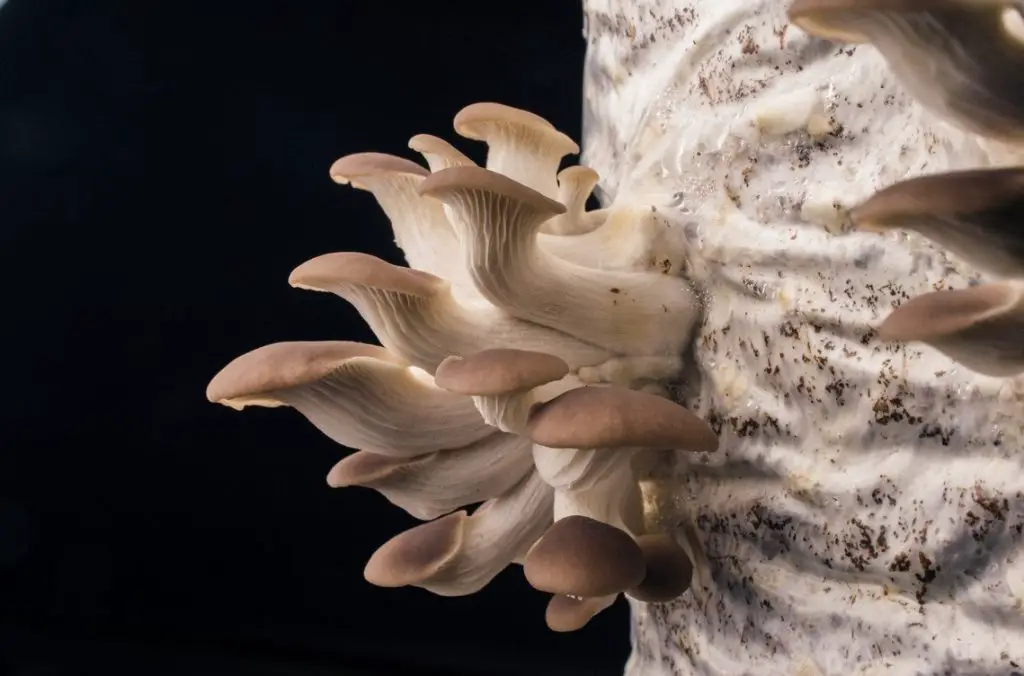
Oyster mushrooms have a delicate and harmonious taste, nutritious, and is suitable for consumption in any form, even raw. Oyster mushrooms external resemblance to a shell that’s why it’s called oyster mushrooms. Growing mushroom at home is simple, even a novice mushroom grower can handle it.
Oyster mushrooms are undemanding; any household is suitable for growing them at home. A rich harvest allows not only to please loved ones with delicious mushroom dishes but also to create a small but successful business.
Table of Contents
Features of Growing Oyster Mushrooms: necessary conditions and premises
If the personal plot permits, it is better to equip two sites for cultivating these mushrooms: for incubation and maturation. But you can use one, for example, a basement, changing the microclimate as the mushroom bodies mature.
It is not recommended to equip the plantation in residential premises because of the specific smell and excess moisture. In addition, spores can cause allergies.
To grow oyster mushrooms at home, you do not need any specific skills in growing mushrooms. But, despite the unpretentiousness of the culture, it is important to properly organize the mushroom plot.
Home oyster mushrooms grow well in basements and cellars, country greenhouses and even sheds. There is no need to create greenhouse conditions. Enough insulation and waterproofing to retain moisture.
To create comfortable conditions, a minimum of equipment is required:
- Heating devices. They are needed if there is a risk that the mercury column will fall below 13 degrees Celsius. Also, elevated temperatures (22-25 degrees) are required only at the initial stage after planting the mycelium. Infrared lamps can be installed as a heating element.
- Sprayers or electric humidifiers. Oyster mushrooms are moisture-loving, the air at the breeding site requires constant moisture. The concentration of moisture in the atmosphere must be 78–95 percent.
- Air circulation hoods. The purchase of equipment is quite costly. If the cultivation of mushrooms for sale is not expected, the purchase of hoods is not required. Simple ventilation pipes can be put into the basement, and the greenhouse or shed can be ventilated through the windows.
- Fluorescent lamps. A pair of devices is enough, since oyster mushrooms do not require bright light.
To obtain a bountiful harvest, the premises must be kept clean. If groundwater seeps into the basement compartment, and there is fungus or mold on the walls, the fungi will get sick: they will become covered with specks, lose their density, and soften.
To avoid jeopardizing the mushroom colony, disinfect the room before planting.
First clean the walls, ceiling and flooring to remove dirt and moldy areas. Next, spray with a solution of sulfate, and cover the walls and ceiling with a mixture of lime and copper sulfate. For better sterilization, you can upholster the walls and basement with dense polyethylene.
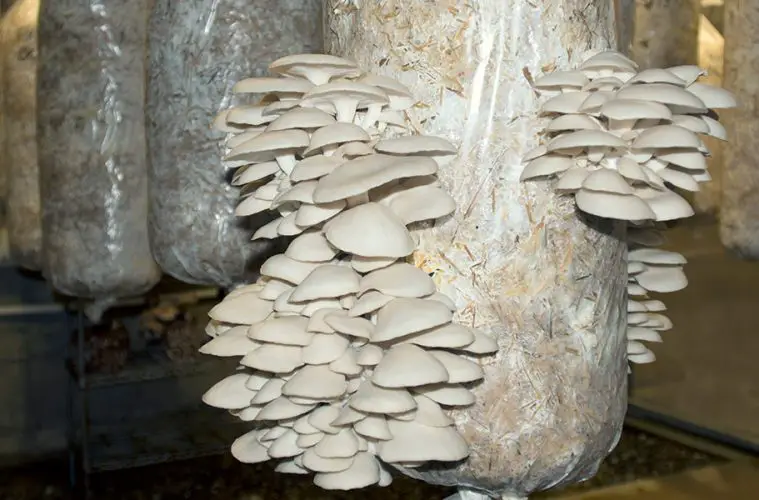
As for the containers for oyster mushrooms themselves, plastic bags are considered the most convenient and inexpensive option. They do not rot or deteriorate.
Bags with soil mixture are laid out on racks or hung from the ceiling by equipping support stands with hangers or by installing hooks into the covering. But you can equip a mushroom plantation in plastic boxes, linen baskets or on tree stumps, stumps.
Step by Step Guide to grow Oyster Mushrooms
The cultivation of these mushrooms is simplified by the fact that oyster mushrooms grow at home on any soil, be it straw, sawdust, husk from seeds, or even cotton rags. Another advantage of culture is the speed of growth. Already a month after sowing, formed mushrooms will appear.
Four rules for how to grow oyster mushrooms at home:
- The soil in bags or containers is not watered. Before the first shoots appear, spray it a little. After that, the room is humidified.
- Oyster mushrooms love coolness. The air temperature should not rise more than 13 degrees, otherwise the oyster mushroom mycelium will die. A home fan or properly organized ventilation will save you from overheating.
- The packages are examined systematically. In case of mold, the block is discarded to prevent fruit flies.
- They visit the mushroom plot in clean clothes, with their hair tidied up. Before the appearance of mushroom bodies in the slots of the bag, it is recommended to use disposable gloves for work.
If you know how to grow oyster mushrooms at home, the harvest will be plentiful. After collecting, the plot must be looked after for 14 days. Care is identical to caring for a non-sprouted mycelium.
Substrate preparation
For successful growth, oyster mushrooms need a nutritious substrate or a donor tree. With artificial breeding, it is easier to grow them in bags filled with soil.
You can make a substrate from different components: dry cereal straw, sunflower seed husks, sawdust from deciduous trees, reed and corn stalks. The components can be used both individually and mixed in any combinations and proportions.
What you need to prepare a soil mixture for growing oyster mushrooms at home:
- The components are crushed. The optimum size of fractions varies from 5 to 30 mm. The crushed mass should smell good, not include moldy fragments, traces of fungus, debris.
- The resulting mixture is completely filled with boiling water to eliminate harmful microflora.
- When the composition is steamed to a mushy consistency, it is laid out in large containers, tamped, and left to swell for 12 hours.
- The soil mixture is taken out of the tank and spread with a thin layer of polyethylene so that the substrate dries and cools.
The amount of nutrient mixture depends on the seed. The substrate and mycelium are prepared in a 10 to 1 ratio.
Selection and purchase of mycelium
Seed material is bought in gardening shops or ordered on the Internet. If you decide to master mushroom growing by growing oyster mushrooms at home, a kilo of mycelium will be enough for the first experience. If purchased hand-held, inspect the bag for moldy and putrid spots. The ammonia smell is also considered a bad sign. If ordering online, read the seller’s reviews.
After acquisition, the mycelium is stored in the refrigerator at 3-4 degrees for no longer than 90 days.
When delivered by mail, the planting material is slowly cooled and sent to a cold place. Before use, the future mycelium should lie down at room temperature and warm up. If planting is carried out immediately after being removed from the refrigerator, the planting material will die from thermal shock. The temperature of the nutrient mixture and the mycelium should not differ by more than three degrees.
Before planting, carefully disassemble the mycelium bar into small pieces. The table on which the mycelium will be disassembled, it is better not only to wash but also to disinfect, wear rubber gloves.
Planting Oyster Mushroom
Novice mushroom growers should choose small bags – 5 kg each for growing oyster mushrooms at home. They can be of any color, not necessarily white or transparent.
How to plant oyster mushrooms for a beginner:
- Stir the planting material and soil mixture on the table, and then place in bags. Or fill the container layer by layer – five centimeters of soil mixture and half a centimeter of mycelium.
- Carefully make slots in the walls of the bags up to two centimeters long. Oyster mushrooms will sprout through them. The size of mushroom seeds is directly proportional to the length of the holes. The distance between the slots is 10-13 cm.
- Provide air to each bag from all directions. The best option would be to hang it from the hooks mounted in the ceiling. But containers can also be placed on shelves.
The first signs of germination of mushroom bodies will appear after 10–20 days. In a transparent container, the threads of the revived mycelium can really be seen after 4 days.
When the first shoots appear, the bags must be kept in the dark. Darkening in a greenhouse or a shed is done using tarpaulin curtains or old bedspreads.
The mercury column of the thermometer should show 18-22 degrees Celsius. A heater or fan heater will help maintain the mode. The humidity must be at least 78 percent, if necessary, the room is humidified.
Oyster Mushroom care during growth
The technology of growing oyster mushrooms after germination requires a change in the initial conditions.
Instructions for growing fruit bodies at home:
| № | Changes in the maintenance of the plot | Achievement of the required indicators |
| 1 | Reducing the temperature indicator to 15-10 degrees. | By turning off the electric heaters and using the fans. |
| 2 | Increase humidity up to 95 percent. | Using a humidifier, or systematic spraying of the walls and floor with water, while not getting on the bags. |
| 3 | Lighting from 10 to 12 hours. | By using fluorescent light bulbs or phyto-lamps with a natural spectrum. |
Ripening mushroom colonies in bags must also be carefully sprayed with water at room temperature so that all of it flows down without stagnating in the fruit bodies, otherwise they will begin to rot. The procedure must be performed daily.
It is required to ventilate the room at least three times a day. If you follow the breeding guide, small mushrooms will form in a month or so. Then it’s up to you – to collect the “babies” for canning or to let the mushroom bodies grow to the size of a good chop.
Another method of growing oyster mushrooms is on tree stumps or blockhouses. Suitable donors for this method are linden, poplar, willow or aspen. To populate the mycelium, hemp is shed well, deep cuts are made in the bark and planting material is placed there. They remove the blockhouses in the shade and wait for the first mushrooms to appear.
Harvesting Oyster Mushroom
The first shoots can really be expected a month after planting. Moreover, the next batch matures sooner – after two or three weeks. In general, one mycelium can give up to four harvests, but the largest are the first two.
One medium bag, while maintaining the required temperature, sufficient moisture and good soil mixture, gives about a kilogram of fruit bodies. It is possible to get 500 g from a small bag.
When the oyster mushrooms have formed to the size you require, they begin to collect them. To remove the mushroom when growing at home, you need to twist the mushroom body, and not cut it. So the mycelium will not be damaged, and a new mushroom body will form faster. The fruits are folded neatly, the caps are very brittle.
If there is a garden, the used soil mixture is used to feed trees and bushes.
Oyster mushroom diseases and pests: control measures and precautions
If growing mushrooms at home is not done according to the rules, oyster mushrooms can get sick. The causative agents of diseases are hidden in the soil mixture, so it must be prepared correctly.
In the raw substrate mixture, fungi rotting, they become dark and soft. The disease is referred to as “dark rot”. If the disease has struck the fruiting bodies, you need to remove them along with the soil mixture.
Oyster mushrooms are attacked by insects: mushroom flies and ticks. Pests occupy myceliums if ventilation is not carried out.
They can be identified by the appearance of light dimples on the caps, similar to bites. Affected mushroom bodies are removed, and the room is disinfected. This operation is performed by means of a smoke bomb. It is left for 24 hours, the doors of the basement or greenhouse are tightly closed. After the room is well ventilated.
Conclusion
Breeding or growing oyster mushrooms at home is a great way to start a mushroom growing career. But even these unpretentious mushrooms require attention from the moment the mycelium is born and until the mushroom bag is fully used. Subject to all the rules of care, oyster mushrooms will grow quickly and amicably, delighting the owners of the plantation with rich harvests.
