Many Mushroom growers need proper guidance in growing mushrooms at home mostly the beginners.
Here we have prepared a proper guide on how to grow mycelium from spores print for growing mushrooms with step by step procedure. We have divided the process into different steps i.e preparing spore suspension from spore print, growing mycelium for mushroom from spore, and at last transplanting for mycelium and at last growing mushroom from mycelium spore.

Table of Contents
How to prepare spore suspension from spore print?
Preparing spore suspension syringe is divided into two steps;
- Things needed to prepare spore suspension
- prepare spore suspesnion syringe Step-by-step
Things needed to prepare spore suspension
To prepare a syringe with a spore suspension, you will need:
- Spore print.
- Sterile bandage on the face from the pharmacy.
- Sterile rubber gloves.
For those who protect their delicate skin from the drying effect of alcohol. - Syringes.
Disposable 5 or 10 ml. I make two syringes from one medium print: 5 and 10 ml or 10 and 10 ml, but more is possible – the print contains millions of spores. - Water.
Sterile, you can even buy water for injection, but bottled will do. - Cotton wool is sterile.
- Knife.
- Alcohol.
It is better not to spare him at all stages of wiping, so it may take a lot, especially if you disinfect them. Minimum 200 ml. For spraying another 200-400 ml (you can add 50-150 ml of water, depending on the amount of alcohol). - Container for breeding spores.
Any small container with a smooth surface is suitable, preferably without corners, for example, a plate, a bowl, a glass. - A candle or any open flame nearby.
- Something to sterilize the atmosphere.
There are options. The first is to buy a special liquid (or spray) at the pharmacy for sterilizing rooms and spray it with a good fine (almost mist) spray for flowers. Pour the second into a spray bottle of simple alcohol and treat the room with it. I recommend leaving it immediately for 15-20. And my favorite option is to saturate the whole air with essential oils using aroma lamps: I take two or three aroma lamps and pour 2-4 types of oils into each, 15-30 drops each, about half the volume of a lamp cup. After 10-15 minutes the room is ready. Any disinfectant oils will do: clary sage, lavender, tea tree, ginger, pine, citrus, etc. (take an interest in their properties). Oils should be good – avoid cheap options. - Clean clothes.
There are a lot of things on clothes, so I put something on right after washing.
how to make mushroom spores syringe? step by step
We sterilize the room. A small space is easier to sterilize, so many choose a clean, dry bathroom, but I do it in the kitchen after general cleaning. If you use a sterilization liquid or alcohol, spray it all around on all surfaces and just into the air, then leave the room for at least 15-20 minutes (see the instructions for the sterilization liquid), and alcohol will definitely burn your airways. If the aroma lamps are with essential oils, then we light them and after 10-15 minutes the room is ready, it is better when there are no drafts. There is also incense – it works well, burns it!
We put on a bandage and gloves and wipe it with alcohol, or simply wipe our hands with alcohol. We wipe the table with alcohol, there is an option to set it on fire for speedy evaporation and better sterilization, but carefully, otherwise, a lot of alcohol is dangerous – it burns strongly.
Advice. Be careful! Take care of your hands doused with alcohol when handling fire and near it! They usually light up to the elbow and the floor of the kitchen, if you try to extinguish them by waving – wrap them in a towel or dip them in water, but no – well, waving, but only burning alcohol scatters around the kitchen. When igniting a large amount of alcohol, temperature spots may remain on the surfaces! So moderation rules!
We wipe the water container with alcohol and set it on fire or wait for evaporation. Pour sterile water (I use bottled, custom-made) and draw it into syringes and put on a needle with a cap. If water is for injection, then we simply fill it with syringes.
We wipe the container with alcohol and set it on fire, then the knife and also set it on fire.
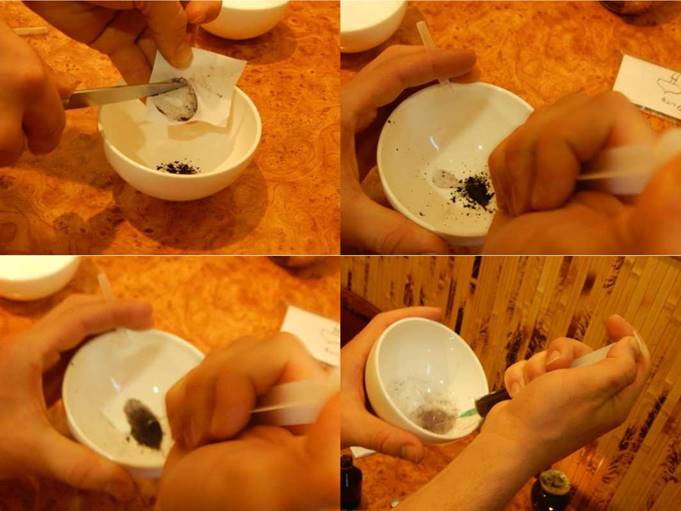
We take a spore print and scrape the spores with a knife into a container and dilute with water from syringes.
It’s better to do it like this:
First, mix a couple of drops of water, if possible, with all the spores with a needle, add a couple more drops and stir well again with a needle, then squeeze out the remaining water with strong pressure, breaking up the lumps of spores – the more evenly the spores are mixed, the better. If it didn’t work out, it doesn’t matter, you just have to be more skillful when collecting suspension into syringes and try to collect all the pieces of spores. After stirring, we collect the suspension into syringes.
We close the syringe needle with a cap, and it is ready for use, but it is better to let it lie in a dark place for 2-3 days, or even better a week so that the disputes come to life. Such a syringe can be stored in a dark, cool place for quite a long time – at least six months, and in general up to 1.5 years.
how to grow mycelium from spore syringe?
Growing mycelium from spore suspension syringe is also divided into two steps:
- Things needed to grow mushroom mycelium
- Growing mycelium from spore suspension syringe
Things needed to grow mushroom mycelium
To grow mycelium we need:
- Corn.
Any grain is suitable for growing, for example: wheat, rye, spelled, barley, barley, rice, corn or oats. The photo shows wheat, but for the rest of the grains everything is the same, only a slight adjustment for the amount of dry grain may be required. For four to five half-liter jars, I take about three cups (250 ml) of dry wheat. Rye and barley give good results - Water.
The better the sterilized water that is used at all stages, the better (less likely to infect the mycelium). Suitable water after a reverse osmosis filter, bottled water, in extreme cases, boiled from the tap. To wash the grain from dirt, just warm tap water is suitable, but after that you need to rinse at least once with clean or boiled water. - Hydrogen peroxide or antibiotic.
There are two options to disinfect planting material as much as possible, the first is to soak and then boil in water with peroxide. After cooking, rinse the wheat again with water and peroxide. Take peroxides in all cases, approximately 100-200 ml per liter of water at your discretion (as a result, you will need 15-25 bottles of 100 ml of peroxide). The second option is antibiotics. Suitable streptomycin, levomycetin, tetracycline (I usually use chloramphenicol). Enough and half a tablet per liter and a half of dry wheat in a sufficient amount of water (about 2.5-3.5 liters). In this case, after soaking overnight, you can boil in the same water without draining if the water and grain are clean. Important! Wheat after overgrowing with mycelium can be used instead of mushrooms, since the mycelium contains active ingredients (6 tablespoons replace about 3-3.5 grams of dry mushrooms). - Banks.
It is optimal to use a half-liter, but a liter is also suitable. Smaller is possible, but why? Too large containers (two or three liters) with mycelium can be made, but if problems arise, you will immediately lose a lot of mycelium. - Foil
- Threads
- The plaster
It is important that the plaster is cloth-based and has a good adhesive to allow it to adhere firmly at 120°C in the humid atmosphere of the pressure cooker. I have used many plasters, but Silkoplast SENSI proved to be the best. In general, you will try a couple of times and you will understand everything, it is necessary that after the pressure cooker the patch does not peel off and air does not enter the jar. - Pressure cooker.
Any will do, as long as the banks fit. I have a Soviet aluminum pressure cooker, which fits four half-liter cans very conveniently, if four half-liter cans do not fit in your pressure cooker, then try it, two or one liter can fit, which is also great. It is this criterion that I am guided by when choosing the capacity of the can. A used pressure cooker can be found at OLX, etc. - Cotton wool .
- Alcohol .
It is better to have a full jar – it will be more convenient to dip the needle into it. - Spore suspension syringe .
A candle for glowing a needle or another source of open fire (tourist burner, burner, etc. or, in extreme cases, a lighter – the main thing is to be comfortable).
Growing mycelium from spore suspension syringe
Measure the required amount of wheat.
The grain can be very dirty, and this dirt contains a lot of unwanted spores and bacteria – these must be removed along with the dust. Therefore, we wash the grain with warm water (tap water is suitable here). Pour a lot of water into the pan with grain and mix thoroughly, then drain the dirty water and so on until the water becomes clear after mixing the grain. The more thoroughly the wheat is washed, the less likely it is to infect the mycelium. At the end, rinse with clean distilled water, possibly with peroxide.
We soak the grains in clean water, preferably with the addition of peroxide or an antibiotic. It is enough to soak for 8-12 hours, or more (up to 24 hours).
After soaking, if peroxide was used, then we rinse and again fill it with water with peroxide for half an hour or an hour, and then boil it in this water. If an antibiotic was used and the water is clean, then we simply boil it in the water in which it was soaked. If the water is dirty, we rinse with water with peroxide and fill it with water with peroxide or an antibiotic for cooking. For best results when cooking, water should be in a saucepan four fingers above the grain, cook over medium heat.
Periodically we take out a couple of grains and cut them across with a sharp knife – the wheat is ready when both halves have a small white dot the size of a needle (millimeter or less). Better to have them a little more than less. This is usually 25-45 minutes boil, depending on wheat and soaking time. The first photo is with the wheat not ready, and the second with the finished one.
Drain the water, it will be brownish and slightly cloudy.
It happens that after cooking the water in the pan is too cloudy, especially when cooked a little longer, in this case, the grain should be washed with water and peroxide once or twice, until the water is clear. Then drain it.
We sterilize jars. To do this, put empty jars in a pressure cooker, pour a small amount of water into it, boil for five minutes over high heat. We take out the jars and lay out the wheat in them.
We close the jars with foil, for which we tear off a square piece and arrange it four times, then tightly compress the neck of the jar.
Then we wrap it with a thread, constantly keeping the tension, so after several turns (10-20) we get a very tight fit of the foil to the jar, which is even suitable for preservation. To make it easier to tie a strong knot, wind the thread several times.
Carefully make a hole with a knife. In order not to tear the foil and not make a new one, it is better to cut it off as in the photo. If the foil fell inside, it’s okay.
We glue the patch so that the cotton wool of the patch completely covers the hole.
We put the sealed cans of wheat in a pressure cooker, pour enough water into it to last for 40-60 minutes of intense boiling (for example, I have about 700-900 ml, and how much you will have, experience will show you) and put on a large the fire. I use the biggest burner and the strongest fire.
Boil over high heat, the steam should go intensively, as in the photo. When the steam stops flowing intensively, this will mean that the pressure cooker has run out of water. But there will still be too much moisture in jars of wheat if you turn it off right away! It must be removed, as excess moisture contributes to the decay of wheat.
In order for the wheat in the jars to dry out, we continue to cook for about 5-10 minutes more (determine for yourself from experience in the future). After turning off the fire, let the closed pressure cooker stand for 15-20 minutes and you can open it. If you open it earlier, then the jars can burst from a sharp temperature drop.
When the wheat in the jars has cooled down, light the fire, soak the cotton wool in alcohol so that it is not too wet. Put the cotton wool on the patch of the jar that you will inject.
Heat the syringe needle on fire until red, cool in alcohol remove the cotton from the patch, insert the needle. If you forget to cool it down, you will pay for the patch and most likely the jar will be screwed up, or you will have to sterilize it again.
Holding the syringe at an angle of 45 degrees, and rotating the jar to spread the suspension over a large area of \u200b\u200bthe grain and speed up the germination of the mycelium, the amount also affects, so we inject from 0.5 to 2 ml of spore suspension at will, although a drop will be enough – it contains millions dispute. And so we repeat with all banks.
We put in a warm, dry place, always dark. We look periodically. Here
stages of grain overgrowth with mycelium. First, barely noticeable white fluffy (or not so) dots, then more and more …
In the last photo, the mycelium is almost ready for transplantation, there are a couple of days left. After about a week or two, the grain in all jars completely germinates with mycelium and is ready for planting in containers. Or to use … The average dosage is about 6 tablespoons of grain sprouted with mycelium. It is not necessary to plant everything at once. You can store mycelium in jars without a refrigerator for a month and a half, and in the refrigerator – for six months confidently, sometimes more.
Transplanting Mycelium to Container
Things needed to Transplanting Mycelium to Container
- Capacities.
Any opaque container (or transparent, securely wrapped in foil) will do. The size is from 12×15 to 20×15 cm. I use disposable aluminum baking dishes measuring 20×15 cm. - All for room disinfection.
- Alcohol.
- Cotton wool.
- Sterile gloves.
- Sterile bandage.
- Two spoons.
- Foil.
- A candle or any source of fire to light the spoons.
- coconut fibre. Perlite.
Soak coconut fiber in advance, squeeze well before use. Perlite is also sterilized (you can simply fill it with water and boil, then draining the water, as an option). - Pressure cooker.
- Clean clothes.
Step-by-step instructions for transplanting mycelium
Pack the coconut very tightly into the jars. It’s best to do this in layers. We put in a pressure cooker for an hour. Then we cool to a temperature below 40 degrees. Perlite is the same, but without tamping.
We are disinfecting the premises, as we did last time. Although this operation requires a little less sterility due to the fact that the mycelium has already formed and has its own immunity.
We put on clean clothes and a bandage, wipe our hands with alcohol (or put on gloves and wipe them with alcohol anyway).
We wipe the table with alcohol and set it on fire. Take care of your hands, which can be in alcohol!
We wipe the container from all sides and also set it on fire, or wait for the alcohol to evaporate – this is not long if you do not pour too much of it.
We wipe the jar with mycelium with alcohol.
We wipe the spoon with alcohol and set it on fire.
how to grow mushrooms from mycelium spore substrate?
We open the jar with a spoon and take out the contents into a container. We level the grain evenly, it is not worth ramming heavily. Important – the layer should be the same thickness everywhere for the best result.
We wipe the second spoon and put it even on top! a layer of coconut, its thickness is at least half a layer of grain, the maximum is the same. Thicker and thinner – worse result. We tamp, but not too much coconut.
Wrap the finished cake in foil and put it in a warm place.
You can check in 4-5 days. Usually, after a week or two, the coconut will be completely overgrown with white fluff on top it’s time to move to an aquarium with glass on top or another tank with a lid for growing. Mycelium (the jar and cake stage) grows best at 30-39 degrees (up to 40), and in the aquarium, mushrooms appear best at 23-25 degrees (up to 29 degrees – if the temperature is higher, the mushrooms stop growing and the mycelium begins to grow). High humidity is also required. To keep the humidity at the bottom of the container, I pour a little water. At least twice a day, airing is necessary – remove the lid and wave it a couple of times over the container.
When the first wave of mushrooms grows, they need to be collected, and everything (completely everything, and even the smallest ones). Long and painstaking but reliable, and then there will be fewer small mushrooms and more large ones.
During growth, the mycelium is acidified, and after each wave, for better and faster germination of the next, it is necessary to reduce the acidity of the mycelium. For this, rehydration is carried out. After collecting the mushrooms, place the cake in a container larger than the cake at least two or three times and pour water so that it is completely immersed in it, put in the refrigerator for a day.
Even tap water is fine for rehydration, but it’s best to be sure it’s alkaline, not acidic. DO NOT use reverse osmosis water (filter system under the sink) – it is acidic in any way! After a day, take it out, drain the water, and put the cake back into the growing container. So five or six waves will appear with a decent amount of mushrooms, you can of course still wait for 7-8-9-10, but more than a couple of small mushrooms in each wave, most likely there will be nothing, although it depends on the thickness of the layer of wheat and coconut – experiment. After each wave, it is important to collect all the mushrooms and it is advisable to rehydrate.